
27 Jul 2021 Salesforce Deployments using Jenkins
Introduction
Salesforce is a CRM (Customer Relationship Management) platform that is used to record the core user journey of a customer when they purchase a service from a company. It has its own proprietary language for development called Apex. As a platform, it is capable of storing and processing large amounts of data. It also has different connectors which neatly integrate with other platforms.
I recently had the opportunity to create pipelines for deploying code to the Salesforce platform using Jenkins. This post describes the challenges I encountered implementing pipelines using a number of different techniques:
If you are looking for ways to orchestrate Salesforce deployments using Jenkins, then keep reading…you can thank me at the end of the article 🙂
First approach: Ant
Jenkins is the most popular CI tool in the market, and provides a wide variety of open-source plugins. Best of all, its support for the Groovy language means pretty much anything can be done in a script. Our first approach was an Ant project that took Salesforce Apex code, built it into a package, and deployed it to a Salesforce environment:
<project name="Sample" basedir=".." xmlns:sf="antlib:com.salesforce"> <property environment="env"/> <target name="deploy"> <sf:deploy username="${sf.username}" password="${sf.password}" serverurl="${sf.serverUrl}" maxPoll="200" pollWaitMillis="500000" testLevel="${sf.testLevel}" deployRoot="src" checkOnly="${sf.checkOnly}" /> </target></project>
Note that the package deployment is done in two stages, which we will now drill into:
Stage 1
This stage validates the package against a given environment to ensure existing functionality isn’t broken. This is done by running all the unit tests in that environment without actually deploying the package. This is achieved by setting checkOnly to true.

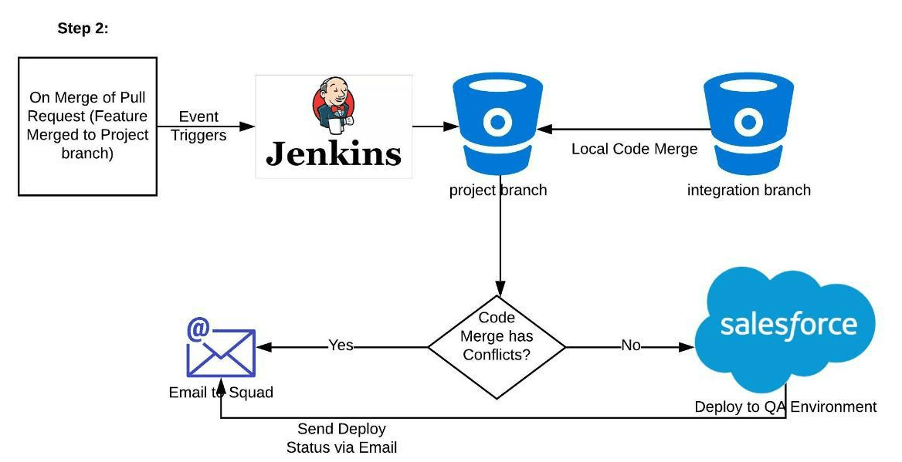
In our case, the team used project branches which were managed by the team lead. The developers would create feature branches for user story implementation, and merge them into the “central hub” integration branch once complete. Every day, the team lead would merge the integration branch into the project branch. Note that a local code merge was done to ensure that the feature branch code was always updated from the upstream integration branch.
Stage 2
If stage 1 was successful, stage 2 then deployed the package to the environment:
This approach took around 20 minutes to validate and another 20 minutes to deploy. In addition, someone from the operations team needed to merge the pull request in order to trigger auto deployment via Jenkins.
The time taken to validate a package against an environment varies, depending on the size of your Salesforce Organisation. We found that the number of unit tests strongly influenced the time taken to deploy. By default, Salesforce needs 75% of unit tests to pass successfully under code validation. Whilst this is regarded as a best practice value, it can be modified if necessary.
So, in summary, this approach had a high cost in the form of branch maintenance and conflict resolution, as it required the Team Lead to merge the project branch every day, and the operations team to merge to trigger a deployment. It was also very slow.
Second approach: Ant with improved Git strategy
The primary goal for our second approach was to allow developers to trigger deployment without the need of the operations team, but also to ensure deployment execution was still approved by privileged people (e.g. Team Leads). This was important because the developers worked offshore while the operations team worked onshore, so removing the merge dependency was a way to bridge the gap between different locations and timezones.
Incidentally, whilst trying this approach SonarQube also introduced support for Apex code analysis, so we thought we’d include that in addition to the traditional PMD code scan.
The key to this approach was that the pipeline behaviour was made conditional on the pull request title. If the title was “Deploy to <environment>“, then the pipeline would deploy to that Salesforce environment. Otherwise the pipeline only validated code against the environment without deploying.
The process involved a developer raising a pull request to validate code against a Salesforce environment. On validation success, the pull request was updated with the build status. Based on the build status, a team lead then updated the title of the pull request to “Deploy to <environment>“, which triggered Jenkins to rerun the pipeline and deploy to the Salesforce environment.
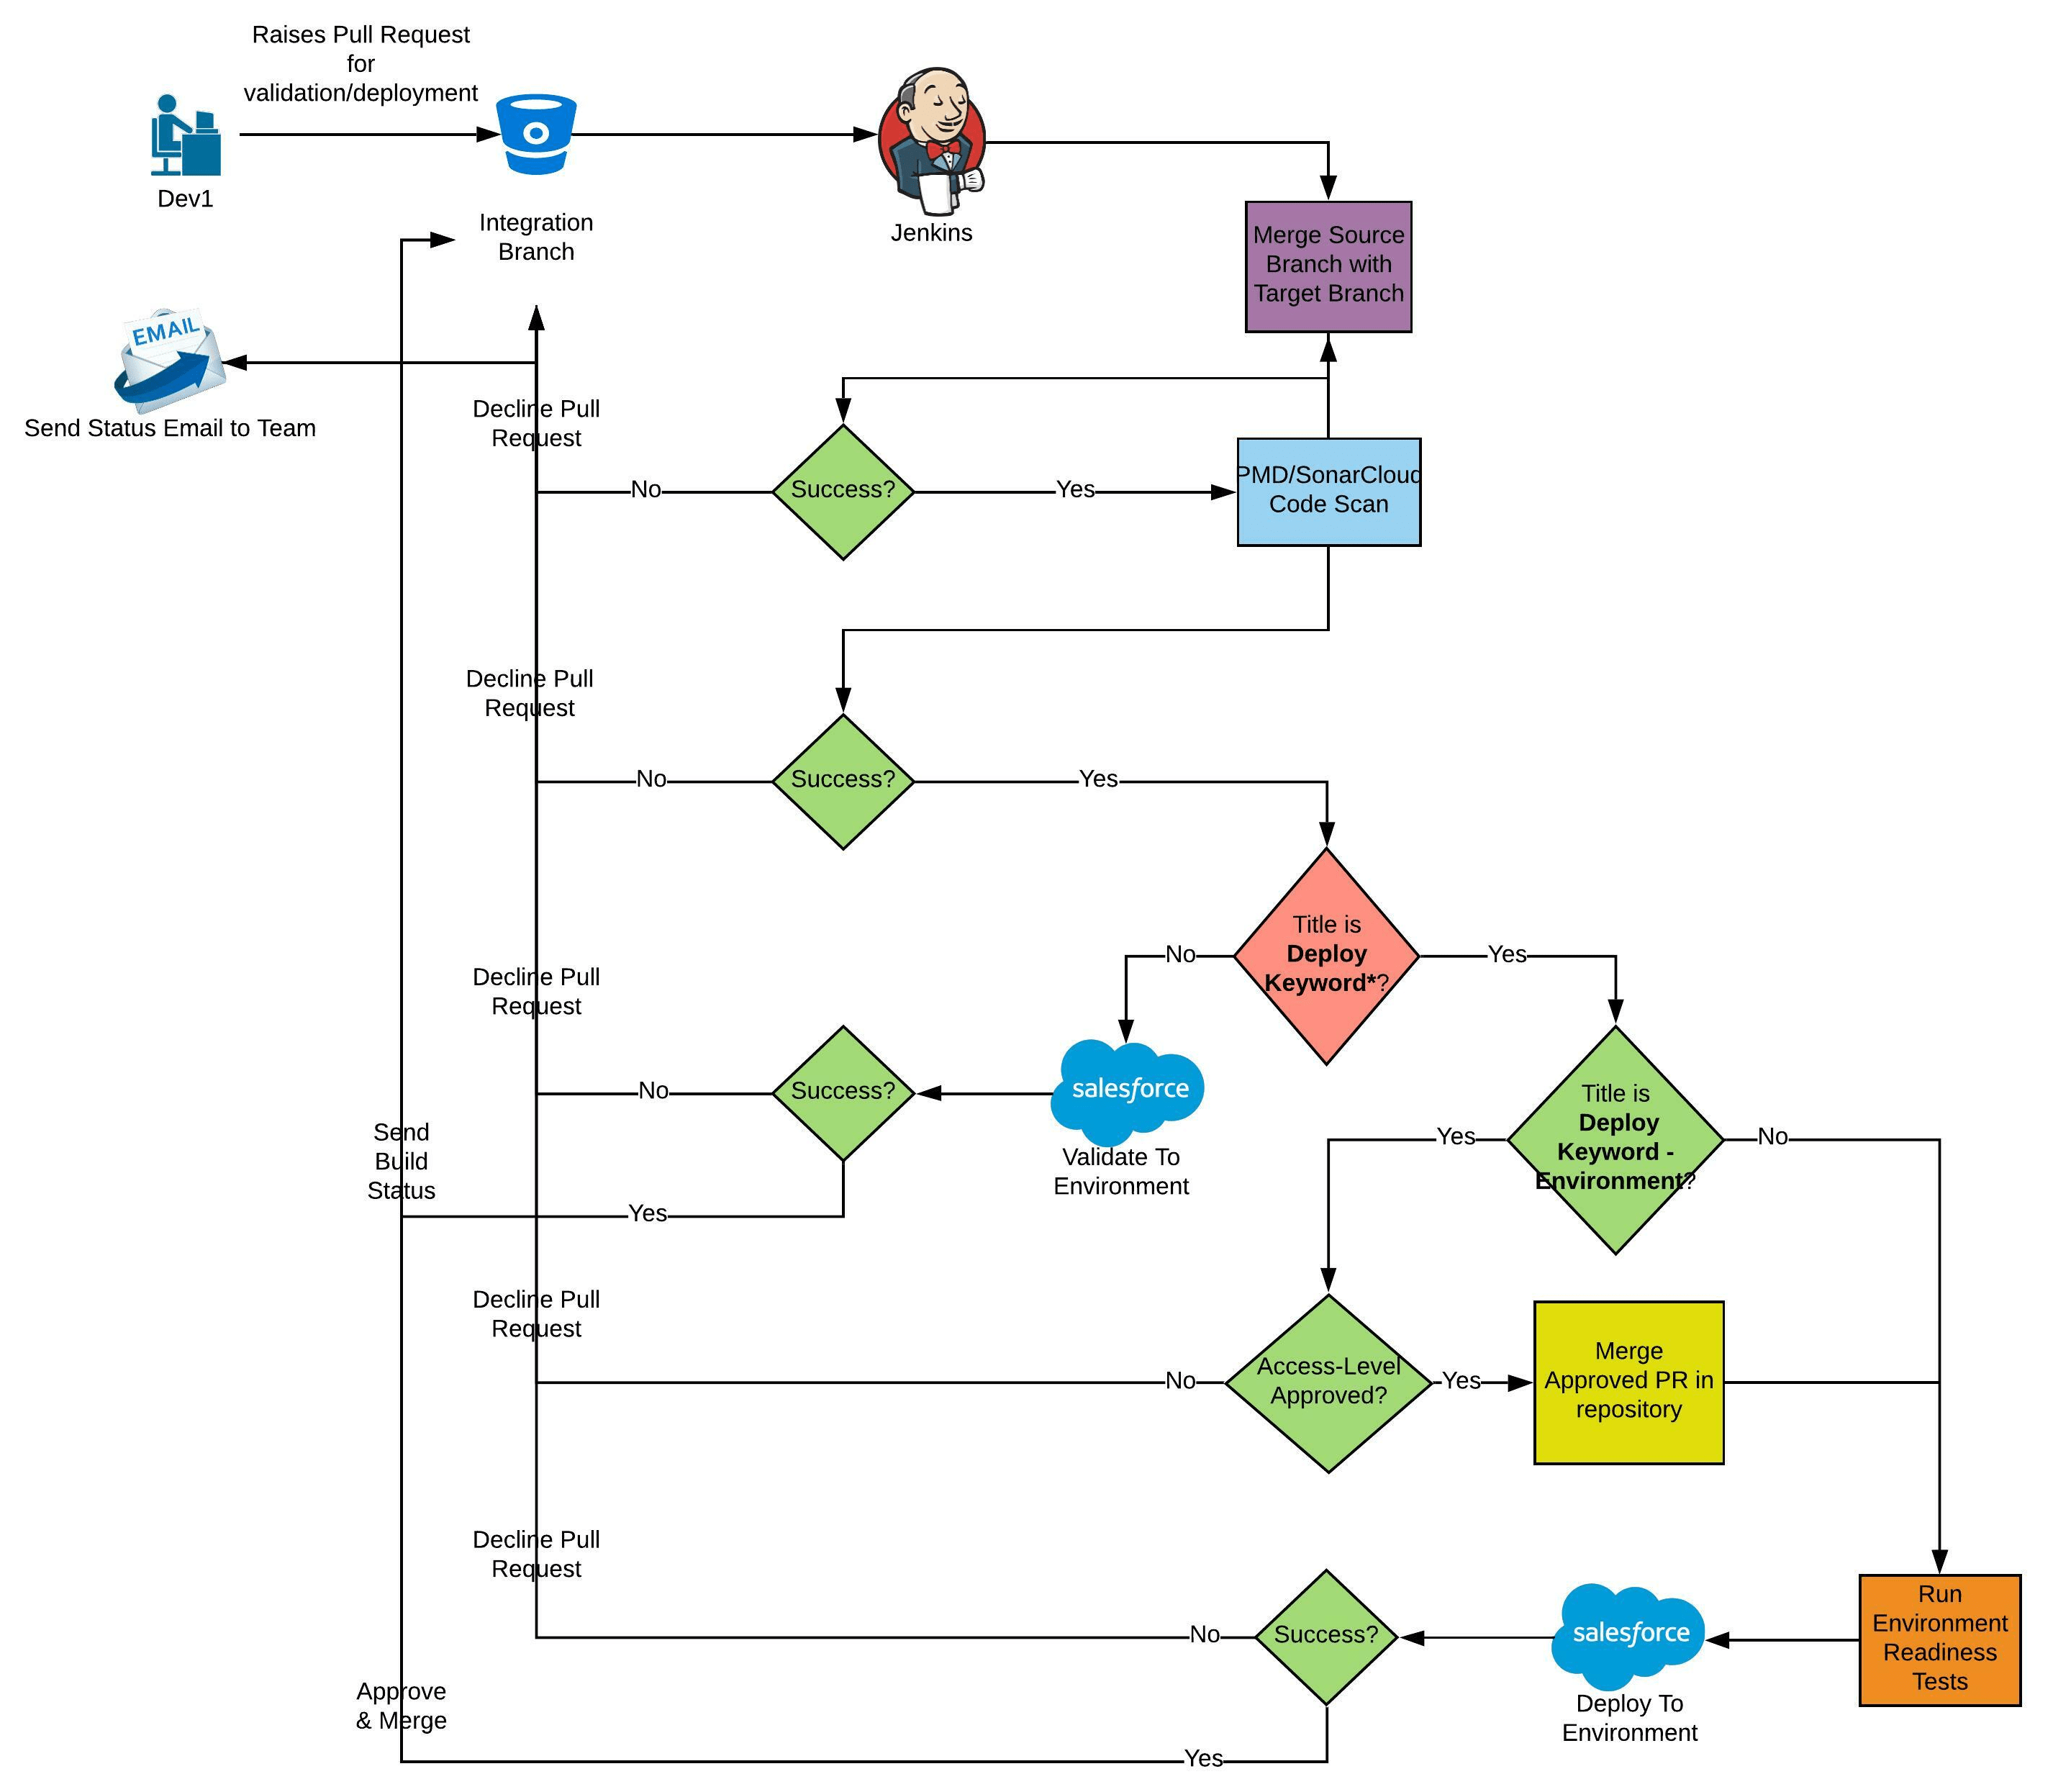
Note that for this approach, the project branches were removed and the integration branch was the only upstream branch across all the teams.
This pipeline process worked well, and the operations team was greatly freed up. However, we still hadn’t speed up the validation or deployment process. To make the process more efficient and decrease the execution time of the pipeline, we had try something completely different.
Third approach: SFDX
The Salesforce Developer Experience (SFDX) introduces a lot of new features, meaning that our code had to be migrated across to the new SFDX structure for it to work in the SFDX environment.
Most importantly, SFDX has its own CLI tool for deploying code or running validation against any environment. It also supports the creation of Scratch Orgs, an environment to be created on-the-fly for code validation, but without having to retain persistent environments.
For this approach, the branching strategy was similar to what we had used previously, except that the code was deployed using a CLI command:
//Deploy to SIT with no Unit tests
sfdx force:source:deploy -p deploypackage/force-app/main/default -w $SF_TIMEOUT -u $SF_USERNAME
Note that this command deployed code as independent files, instead creating a complete deployment package. This helped us to strip-down the deployment to only the files that were modified in a particular pull request (by using Git APIs). Note, however, that if a file was deleted as part of a pull request, then an additional command would need to be run to delete the corresponding package:
//Delete files using the delete command
sfdx force:source:delete -p deletepackage\\force-app\\main\\default\\ -w 90 -u $SF_USERNAME -r
Note also that, to implement this, the Jenkins pipeline had to create two separate folders, and selectively place files in them according to the pull request.
This approach brought the overall duration of a typical deployment down to around 2 seconds (dependent on the number of files included in the pull request). This greatly decreased the time a developer had to spend waiting for feedback. The number of unit tests that were run also vastly decreased, as Salesforce only ran a given unit test if associated functionality had been changed.
Conclusion
For us, the key to a deployment pipeline that was both quick and required minimal manual intervention was our Git branching strategy, along with the use of more efficient features introduced in recent Salesforce releases. There are plenty of other tools for performing similar deployment strategies in Salesforce, but I believe that which you use is depends on how you use Salesforce, and how far you are willing to go to ensure code quality in the process of deployment.
No Comments