

20 May 2021 Optimizing your CDN cache with Cloudflare and Nginx
Recently I worked on a personal project to help support the Linux distro I use as a daily driver, Manjaro. I set up a package mirror to allow users from the community to connect to my server and pull updates or new packages for install. In this post I’ll talk about how I set things up to offload over 90% of the traffic to Cloudflare’s CDN.
Getting Started
When distro updates get pushed there can be large spikes in traffic, and I would have to be prepared to serve around 1TB of traffic a week. I was doing this on a budget, so I was trying to work out the most cost-efficient way to support all this traffic. Nor could I opt-out of offering a mirror server quickly if I hit a data limit or some other cost barrier, due to the way the list of mirror servers is published. Enter Cloudflare and its CDN cache!
I did some research and settled on a pretty basic tech stack that would cut down on the amount of data I had to serve from the origin server directly:
- Linode Server running Linux
- Nginx as the origin server
- Cloudflare to run as a CDN
The big player here would be Cloudflare, which would have to cache as much of the traffic as possible. After a bit of setup and security tuning, I was ready to start testing and see what kind of cache hit ratio I could get.
Initial Testing
Initial tests showed I was only getting a 30% hit ratio. That was way too small for what I was trying to do. So I dived into the docs to find out more about caching setups with Cloudflare, and how the mirror worked when interacting with the package manager Pacman.
Pacman starts by fetching a particular DB file store from a predefined path. This DB file contains all the info it needs about what packages are available, and the versions on offer. It does a local comparison to check if there are updates to any of its installed packages, then pulls the new version, based on the info in this DB file.
The paths to individual packages don’t change often. The package manager finds out about newer packages from the DB file. It is not a case of pulling from a /latest path, or some other symlinked path, where the path would stay the same and the package version behind it change.
So this meant I could just cache everything, right? Well, no, that pesky DB file must stay up to date. It’s the only way for the package manager to find new versions of packages.
Configuring Cloudflare
So it was time to play around with the Cloudflare caching rules, and see how we went. I pushed the cache level to the longest duration and created an exception for the DB file using Cloudflare’s page rules.
This worked a little better. I was up to about 35% cache hit now.
By doing some debugging in a browser I was able to see what resources were getting cached, and what was being served by my origin server. It looked like a lot of the packages were still not getting cached. In fact, none of the packages with the extension .tar.zst were being cached. That is an extension used mainly for arch packages with the Pacman package manager.
After some more digging into the Cloudflare docs I could see what they will cache by default. This page explains they only cache files with extensions that are the most common on websites. No surprise to find that my .tar.zst extension was not included.
Also on that page, I found out that the largest file we could cache is 512MB. So the packages would fit in the cache. We just needed a way to tell Cloudflare to cache them, Cloudflare has a cache setting called “Cache Everything”. But some of the other docs point out this will ignore the exceptions I created for the .db files.
So I was left with one other option: Cloudflare’s “origin cache-control”. setting This allows you to use headers set by your origin server to control Cloudflare’s cache. This meant I could configure my Nginx server to specify what sort of caching Cloudflare should do.
Understanding Cache Headers
Nginx’s documentation describes how to set headers on particular files using the location directive, and in what order Nginx will use those settings. However, before we get into that, we need to understand better what exactly can go in a Cache-Control header.
Selecting the correct collection of values for the Cache-Control header is simpler than most people think. The most important question is: “Should this be cached?”. Once you have answered this question you are 90% there.
You should look at caching everything that the browser considers static. So this means CSS, JS, images, icons, gifs, etc. HTML is not generally considered static, because different things can appear in a HTML page, even though its URL will remain the same.
Now you need to look at the lifetime of things. How frequently will they change? It’s more likely that a JS or CSS file will change than an image or icon. You tweak the length of time a thing is cached based on this analysis, using the Max-Age variable. If it’s something you expect to be updating semi-frequently, or you want it to be very strict about what it does when the max-age expires, you can add an extra value: must-revalidate or proxy-revalidate.
The proxy-revalidate setting only applies to Cloudflare, not the user’s browser. The must-revalidate setting works for both browsers and Cloudflare. The action it enables is related to what it will do when the max-age setting expires. If you set one of these, the device is directed to request that data from the origin again.
This is great for ensuring you never serve stale data. But what if it’s an image, or something else where using the stale version won’t break things? In that case, it’s fine to serve it, but remember to update the cache the next time you do an origin request. You can get this behaviour with the stale-while-revalidate header. Use this to allow Cloudflare to keep serving that data while it updates the cache, rather than forcing a hard stop and making clients wait while the data is updated.
This is all summarised quite nicely by the Cloudflare documentation:

The values of public, private, and no-store have way more impact when serving content to a web browser than my use case, but it’s still interesting to consider. These values can be used to tweak what devices out on the internet will store what data when they are trying to cache responses. The public value is great for all of your static content. The private value is great for things like account pages or any other members-only data. The no-store value is excellent for sensitive or frequently changing data. Once again, the Cloudflare docs sum it up quite nicely:

The last value of note that I like to use is no-transform. It is good for ensuring specific items are not messed with when transferred to the user. If you have things that are pre-compressed and then hashed, or maybe things you don’t want extra compressed, like an image, this setting is for you. It tells the CDN and browser to not mess with the contents of the file and just keep all of its bits exactly as they are.
Configuring Nginx
So now I was able to put this all together by configuring Nginx to serve up the headers I wanted. To get started I set a site-wide default header:
location / {
    add header Cache-Control "public, max-age=3600, must-revalidate";
}
This meant that by default it will cache everything for an hour. But after that, the content must be checked with the origin again, but doesn’t have to expire and be cleared from the cache.
Next came the DB files. I used the same settings as the sitewide setting but added no-transform to ensure compression didn’t mess with anything like the SHA1 hash:
location ~* \.(db|db\.sig|gz|files|sig) {
    add header Cache-Control "public, max-age=3600, must-revalidate, no-transform";
}
Finally, the packages themselves. Their direct paths will never change, so I could cache them forever to maximise hits:
location ~* \.(tar|zst|xz|xz\.sig|zst\.sig) {
    add header Cache-Control "public, max-age=604800, immutable";
}
The immutable value tells Cloudflare that this never changes, and is once-again best described by the Cloudflare docs:
immutable– Indicates to clients that the response body does not change over time. The resource, if unexpired, is unchanged on the server and therefore the client should not send a conditional revalidation for it (e.g.If-None-MatchorIf-Modified-Since) to check for updates, even when the user explicitly refreshes the page. This directive has no effect on public caches like Cloudflare but does change browser behaviour.
You will note I also used the public value in all of the headers set out above. This is because I am serving content with weird extensions. You can customise the cache behaviour further by playing with the available values outlined on the Cloudflare page linked above.
Conclusion
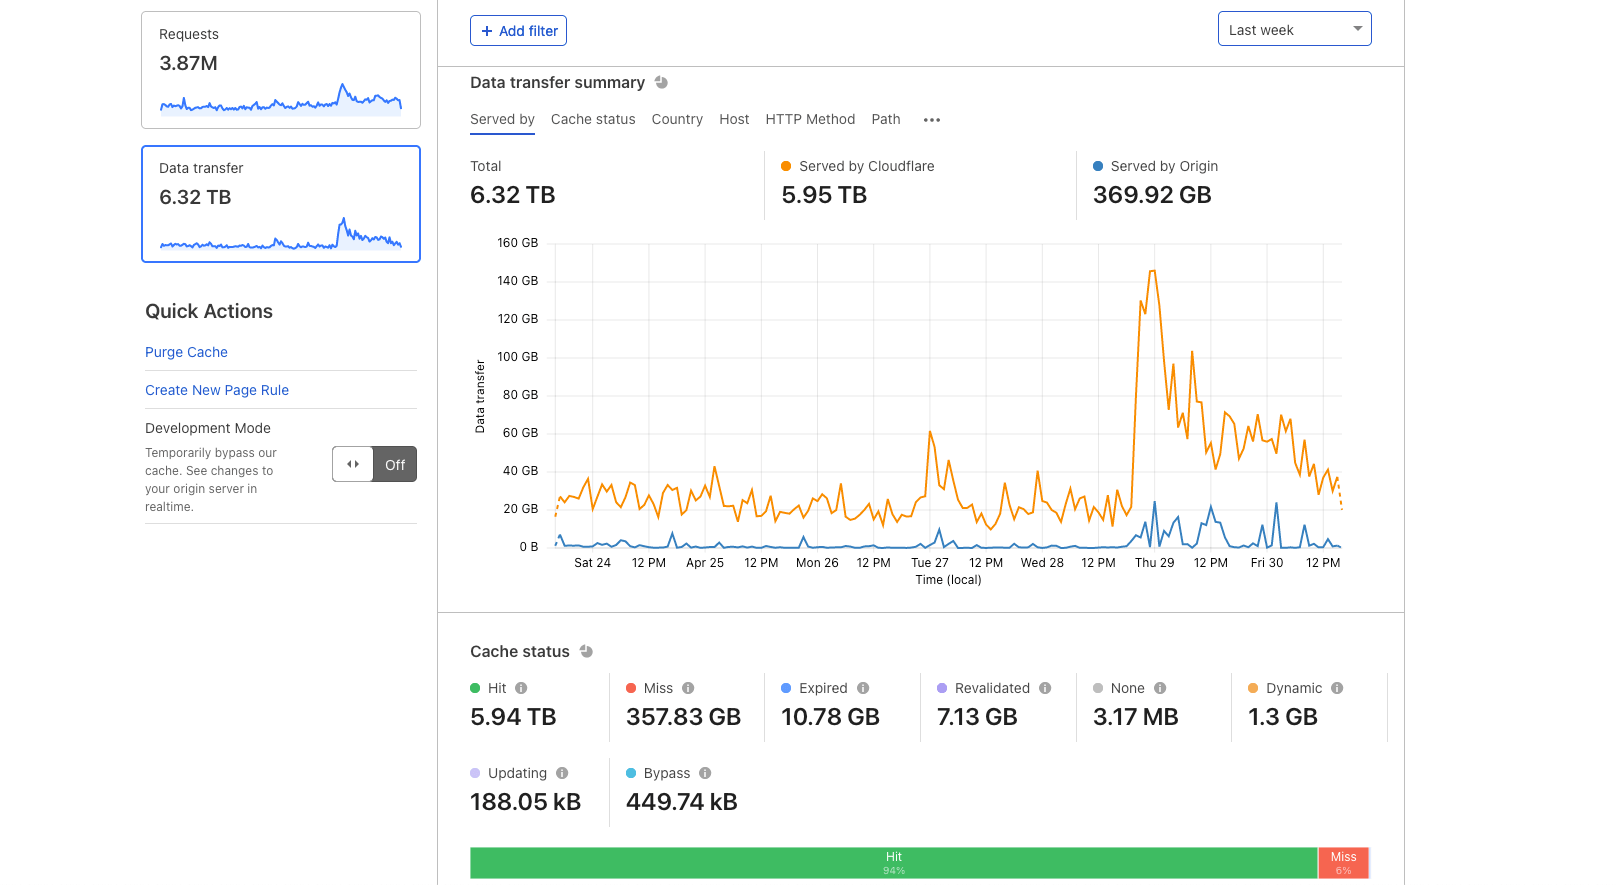
Once I deployed these changes, my cache hit ratio went through the roof, and now remains consistently above 90%. I serve terabytes of traffic and yet only a small percentage of it actually comes from my origin. It’s amazing how much difference a CDN and a small amount of header configuration can achieve!
Bogdan
Posted at 20:26h, 21 SeptemberI can see that you are not using Cloudflare anymore. What’s your experience with Jetpack and how changed nginx’s cache rules? Thank you
Nicholas Romero
Posted at 01:02h, 04 AprilThe nginx config should be `add_header` not `add header`