

17 Dec 2024 Generate Allure Reports from sharding in Playwright using GitHub Actions
As software development evolves, robust testing has become more important than ever. Playwright stands out as a powerful tool for running end-to-end tests, offering features like sharding to enhance performance and efficiency. However, to get the biggest benefit from sharding, it’s essential to consolidate the test results from multiple shards into a unified report. In this blog, I’ll guide you through the process of merging and generating a single Allure report from multiple Playwright shards, seamlessly integrating this workflow into your CI/CD pipeline using GitHub Actions.
Before we get started
Before diving into the process of generating an Allure Report for Playwright shards, let’s take a step back to understand the basics. We’ll start with an overview of Playwright—what it is and why it’s a preferred choice for end-to-end testing. Then, we’ll explore the concept of sharding in Playwright, and finally, how sharding differs from parallel execution in Playwright.
What is Playwright?
Playwright is an open-source automation framework developed by Microsoft that allows developers to perform end-to-end testing across multiple browsers: Chrome, Firefox, WebKit, etc. It has gained popularity for its reliability, speed, and developer-friendly API. It is an excellent choice for web automation and browser testing. One of Playwright’s key features is its ability to simulate real-world situations by automating interactions that mimic how users will engage with your application, like the native mobile application testing on Chrome.
Why Playwright?
Playwright stands out from other testing tools due to its exceptional features:
- Support for cross-browser testing, cross-platform compatibility, and the ability to test native mobile web application features.
- Fully isolated test execution, even during parallel execution.
- Advanced capabilities such as an auto-wait mechanism for elements, and a trace feature that captures videos, screenshots, and logs, significantly reducing flaky tests and enhancing resilience.
What is Sharding?
Before we delve into the nuances of sharding, let’s first understand its meaning, and how it differs from parallel execution. To do this we’ll consider the example of an application that has 10 Suites to execute, with around 200 tests spread across 10 spec files.
Parallel Execution
In Playwright’s parallel execution mechanism, if you configure 4 workers, each test suite is assigned to a worker. This means the spec files are executed independently by the workers. This is straightforward to configure, but if one set of suites takes significantly longer than the others to execute (for example, if the set contains more suites, or those suites contains significantly more tests than the other sets), the imbalance can slow down the total execution time. Additionally, parallelized tests will still be executed on a single machine, potentially impacting overall performance and execution time.
Sharding
To address the limitations of parallel execution, Playwright introduced sharding. Instead of assigning entire suites to workers, sharding distributes the individual tests evenly across a specified number of shards. In simpler terms, it divides all the suites into smaller chunks and distributes them to the shards for execution, which balances the workloads more effectively. Furthermore, each shard will run on a separate machine, which can reduce test execution time even further.
Sharding parameters can be specified when running Playwright from the command lines like this:

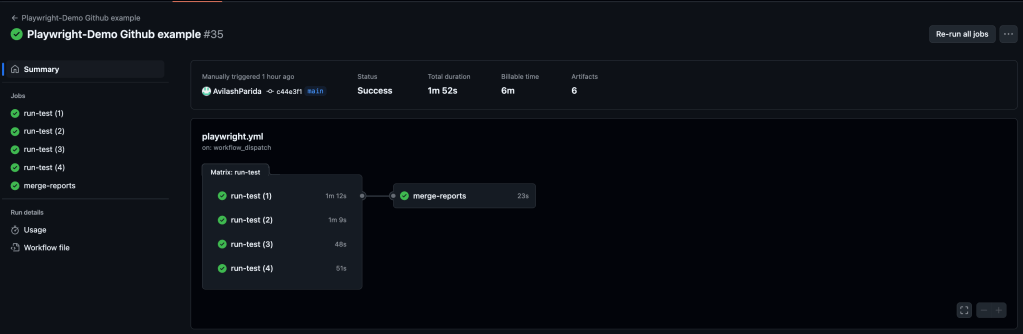
The results of each test shard can also be viewed. For example, when running Playwright in Github Actions:
Putting it into the CI/CD pipeline
Now that we understand what sharding is, let’s explore the CI/CD process of generating the Allure report from Playwright shards using Github Actions.
Creating a Github Actions YAML file for Playwright Shards execution in CI/CD
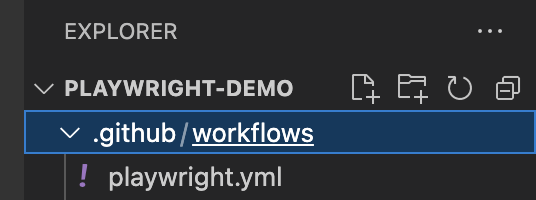
Let’s assume you have a Github repository and you want to integrate test execution into your CI/CD pipeline. You want test execution to run as part of the build process, or for standalone execution. To achieve this, you will need to create a .YAML file under the .github/workflows directory. For example:
Once the .yml file is created, the next step is to define the necessary instructions in the file. To generate an HTML Allure report for Playwright shards, we will define two jobs within the workflow:
Job 1: Running Tests with Playwright shards
This is the job that runs your tests using Playwright shards:
name: Playwright-Demo Github example

on:
  workflow_dispatch:
  push:
    branches: [ main ]
  pull_request:
    branches: [ main ]

jobs:
  run-test:
    runs-on: ubuntu-latest
    strategy:
      fail-fast: false
      matrix:
        shard: [1, 2, 3, 4]

    steps:
      - name: Checkout
        uses: actions/checkout@v4

      - name: Set up Node
        uses: actions/setup-node@v3
        with:
          node-version: 20

      - name: Install dependencies
        run: npm ci

      - name: Install Playwright browsers
        run: npx playwright install --with-deps

      - name: Run Playwright tests
        run: npx playwright test --shard=${{ matrix.shard }}/4

      - name: Upload Allure results
        if: success() || failure()
        uses: actions/upload-artifact@v4
        with:
          name: allure-results-${{ matrix.shard }}
          path: allure-results/
          retention-days: 1
Breaking down those steps:
- Trigger conditions (
workflow_dispatch): This determines when the workflow will run. In this example, it is configured to trigger on bothpushandpull_requestevents on the main branch. This means the workflow executes automatically for pull requests and commits pushed to main.
- Initial setup: The first 4 steps under the
run_testjob check out the temporary code base on the system, set up Node 20 (or above) and install all necessary dependencies for running the project.
- Run tests with sharding: In the next steps, we run all of the Playwright tests using the shard mechanism, and upload both the blob report and Allure reports for each shard to the Github artefact storage.
Job 2: Merging Shard Reports into a Single Allure report
This job downloads all the shard reports from Github artefacts storage, and merges them into a single Allure report. Note that this will only happen if the merge-multiple setting is true in the “Download Allure Results” step:
merge-reports:
    if: always()
    needs: run-test
    runs-on: ubuntu-latest

    steps:
      - name: Checkout
        uses: actions/checkout@v4

      - name: Set up Node
        uses: actions/setup-node@v3
        with:
          node-version: 20

      - name: Install dependencies
        run: npm ci

      - name: Download Allure Results
        uses: actions/download-artifact@v4
        with:
          path: allure-results/
          pattern: allure-results-*
          merge-multiple: true

      - name: Generate allure report
        run: npx allure generate allure-results --clean

      - name: Upload Allure results
        uses: actions/upload-artifact@v4
        with:
          name: allure-results
          path: allure-results/
          retention-days: 30

      - name: Upload Allure report
        uses: actions/upload-artifact@v4
        with:
          name: allure-report
          path: allure-report/
          retention-days: 30
The final steps upload the Allure results artefacts onto the Github action for the build.
After running jobs 1 and 2, the Github artefacts will appear as shown below :

To ensure the reports are retained for a longer duration, you can upload them to an S3 bucket. There are a few benefits to doing this:
- Centralised view of Test Results: You’ll have easy and centralised access to the test results even in multiple environments. This aids in keeping a history of all test executions.
- Easier sharing of information: You can share the information between different steps in the workflow to enhance the CI/CD configurability. Note that you’ll be sharing the URLs and credentials as dynamic environment variables.
To set this up you’d add something like this to the Job 2 YAML file:
      ...
      - name: Configure AWS credentials
        uses: aws-actions/configure-aws-credentials@v2
        with:
          aws-access-key-id: ${{ secrets.AWS_ACCESS_KEY_ID }}
          aws-secret-access-key: ${{ secrets.AWS_SECRET_ACCESS_KEY }}
          aws-region: ap-southeast-2

      - name: Prepare and Upload Allure report to S3
        run: |
          # Set environment variables
          timestamp=$(date -u +'%Y%m%d%H%M%S')

          # Prepare S3 URI
          S3URI="s3://playwright-shard-reports/allure-report"

          # Upload Allure report to S3
          aws s3 cp ./allure-report/ "${S3URI}-${timestamp}/" --recursive

          # Set the S3 URL for the object
          S3_URL="https://playwright-shard-reports.s3.ap-southeast-2.amazonaws.com/allure-report-${timestamp}/index.html"

          # Export the S3_URL to be used in other steps
          echo "S3_URL=${S3_URL}" >> $GITHUB_ENV

          # Print the S3 URL directly
          echo "Allure reports are available at: $S3_URL" >> $GITHUB_STEP_SUMMARY
Finally, we can set up a Slack notification that points to the newly-generated report:
  - name: Send Slack Notification - Reports Uploaded
    uses: slackapi/slack-github-action@v1.22.0
    with:
      payload: |
        {
          "channel": "C07PBSK7N9F",
          "text": "Allure reports have been uploaded to S3.\nView them here: '${{ env.S3_URL }}'.\nStatus: '${{ needs.run-test.result }}'."
        }
    env:
      SLACK_WEBHOOK_URL: ${{ secrets.SLACK_WEBHOOK_URL }}
So in summary, Job 2 will generate a single consolidated report from all the shards, upload it to the S3 bucket with a unique timestamp, fetch the S3 URL for the generated report, pass it to the Github workflow as a build step, then share the URL on Slack. When executed, it’ll look like this:

For details on hosting and configuring an S3 bucket to store reports, check out this post written by my colleague Prashant Mohapatra.
Conclusion
In this post I’ve showed how Playwright’s sharding feature can significantly enhance test performance. I’ve also demonstrated how Github actions can be used to automate the generation of Allure reports from test results, then seamlessly upload those reports to S3, and finally send Slack notifications to team members to make the test results effortlessly available.. The end results is a CI/CD pipeline optimised for collaboration and producivity.
No Comments