

11 Dec 2023 Simplify API Test Automation with Playwright, Jest and allure
Are you weary of the relentless search for an API test framework that not only boasts incredible reporting capabilities but also provides a comprehensive view of your API calls? Look no further! In this blog post, I will introduce you to an efficient and easy-to-use test automation framework that combines the power of Playwright, Jest and Allure Report. This framework provides a seamless experience for writing and running automated tests for APIs. So, let’s dive in and explore the Playwright-Jest-Allure API Test Automation framework!
Introduction
Before we delve into the framework, let’s briefly understand the tools involved. Playwright, known not only for API testing but also highly regarded in the field of browser automation testing, is a versatile library. In our example, we primarily utilise Playwright for API testing. The framework enables automated testing of APIs by simplifying the process of writing and executing API tests. It allows for seamless integration with popular testing frameworks like Jest, enabling robust test suites with features like assertions, test runners, and powerful mocking capabilities. With Playwright API testing, developers can simulate user interactions, make HTTP requests, validate responses, and ensure the functionality and stability of their APIs.
On the other hand, Jest is a popular JavaScript testing framework that provides a simple and intuitive way to write tests. It offers features like test assertions, test runners, and powerful mocking capabilities.
Allure report is a powerful and visually appealing reporting framework that provides comprehensive test reports for automation projects. With its intuitive interface and detailed insights, Allure report enhances test result visualisation, making it easier to analyse test outcomes. It supports various test frameworks and integrates seamlessly with popular testing tools and CI/CD pipelines. With the ability to create attachments and customise report appearance, Allure report improves collaboration and decision-making within development and testing teams, enabling better communication of test results and facilitating efficient debugging and issue resolution.
Framework
The automation framework is located here in github. The key components of the test automation framework are depicted below:
API Manager
The ApiManager encapsulates the functionality for making various HTTP requests.
import {APIRequestContext, APIResponse, request} from "@playwright/test";
import {traceApiCalls} from "../reporter/reportApiDetails";

class ApiManager {

     apiContext: APIRequestContext = {} as APIRequestContext;

     apiResponse: APIResponse = {} as APIResponse;

     apiDefaultHeaders: { [key: string]: string; } = {'Content-type': 'application/json; charset=UTF-8'};

     /**
      * Function for making GET API call
      * @param url: destination URL
      * @param headers: headers in the request
      * @param body: body of the request
      * @return APIResponse
      */
     async get(url: String, headers?: { [key: string]: string; }, body?: String) {
          return this.send("GET", url, headers, body);
     }

     /**
      * Function for making POST API call
      * @param url: destination URL
      * @param headers: headers in the request
      * @param body: body of the request
      * @return APIResponse
      */
     async post(url: String, headers?: { [key: string]: string; }, body?: String) {
          return this.send("POST", url, headers, body);
     }

.....
.....
.....

     /**
      * Function for making the HTTP call
      * @param method: HTTP method. Example: GET, POST etc.
      * @param url: destination URL
      * @param headers: headers in the request
      * @param requestBody: body of the request
      * @return APIResponse
      */
     async send(method: String, url: String, headers?: { [key: string]: string; }, requestBody?: String) {

          const finalRequestHeaders = { ...this.apiDefaultHeaders, ...headers} //TODO: Check if headers is correct and print

          const options = {
               data: requestBody,
               headers: finalRequestHeaders
          };

          this.apiContext  = await request.newContext();

          if (method.toUpperCase() === "GET") {

               this.apiResponse = await this.apiContext.get(url, options);

          } else if (method.toUpperCase() === "POST") {

               this.apiResponse = await this.apiContext.post(url, options);

          } else if (method.toUpperCase() === "PUT") {

               this.apiResponse = await this.apiContext.put(url, options);

          } else if (method.toUpperCase() === "PATCH") {

               this.apiResponse = await this.apiContext.patch(url, options);

          } else if (method.toUpperCase() === "DELETE") {

               this.apiResponse = await this.apiContext.delete(url, options);

          }

          await traceApiCalls(method, url, requestBody, this.apiResponse, finalRequestHeaders);

          return this.apiResponse;
     }

}

export default new ApiManager();
Full code is here.
The class defines several methods for different HTTP request methods (GET, POST, PUT, PATCH, DELETE), along with a generic send method for making the actual HTTP calls. These methods serve as convenience wrappers around the send method.
Inside the send method, the provided parameters (method, url, headers, and requestBody) are used to construct the necessary options for the API request. The finalRequestHeaders object combines the default headers with any additional headers provided.
Next, an instance of the Playwright test context is created using request.newContext(), and the corresponding API request is made based on the provided method using the apiContext instance. The response is stored in the apiResponse property.
After the API call, the reportApiDetails module is used to trace and report details of the API call, including the method, URL, headers, request body, and response.
Finally, the apiResponse is returned from the method.
The class is exported as a singleton instance using export default new ApiManager(). This ensures that there is only one instance of the ApiManager class throughout the test run.
This ApiManager class provides a convenient and standardised way to make HTTP requests and handle API responses within this automation framework. This class can be extended to include more request types when needed.
Report API details
In my experience, API test automation poses the challenge of effectively logging request and response data for debugging, a task far more intricate than screenshot capture. In this framework, we seamlessly employ Allure reporting to facilitate meticulous tracing of API calls.
Report API details contains methods to report API details for allure reporting and console logging.
import {APIResponse} from "@playwright/test";

export async function traceApiCalls(method: String, url: String, requestBody: String, response: APIResponse, headers?: { [key: string]: string; }) {

    const trace = process.env.TRACE_API_CALLS.toLowerCase();

    if (trace === "true") {

        const name = method + ": " + url;

        const requestHeaders = await getHeadersString(headers);

        const requestDetails = `REQUEST HEADER(s): \n${requestHeaders} \nREQUEST BODY: \n${requestBody}`;

        const responseHeaders = await getHeadersString(response.headers());

        const responseBody = await response.text();

        const responseDetails = `RESPONSE STATUS: ${response.status()} \n\nRESPONSE HEADER(s): \n${responseHeaders} \nRESPONSE BODY: \n${responseBody}`;

        await console.log(`\n ================================ \n${name} \n\n${requestDetails} \n\n\n${responseDetails} \n ================================ \n`);

    }

}

export async function getHeadersString(headers: { [key: string]: string; }) {

    let headersString = "";

    for (const key in headers) {
        if (headers.hasOwnProperty(key)) {
            const value = headers[key];
            headersString = headersString + `${key}: ${value}\n` ;

        }
    }

    return headersString;
}
The traceApiCalls method is responsible for reporting the API details –
- It takes in parameters such as the method (API request method), url (destination URL), requestHeaders (API request headers), requestBody (API request body), and response (API response).
- Inside the method, there is a check for the
TRACE_API_CALLSenvironment variable. If the variable is set totrue, the method proceeds with reporting the API details; otherwise, it skips the reporting. - The method starts by constructing the name of the API call by combining the method and url.
- Next, it converts the
requestHeadersto a string using thegetHeadersStringmethod. IfrequestBodyis notundefined, it is included in therequestDetailsstring. - Then, the method retrieves the response headers using
response.headers()and the response body usingresponse.text(). - The
responseDetailsstring is constructed by combining the response status, headers, and body - Finally, the method creates a
reportby combining the request and response details. Thereportis added as an attachment to the allure report usingreporter.addAttachmentand is also logged to the console usingconsole.log.
The traceApiCalls method helps in tracing API requests and response details as displayed below:

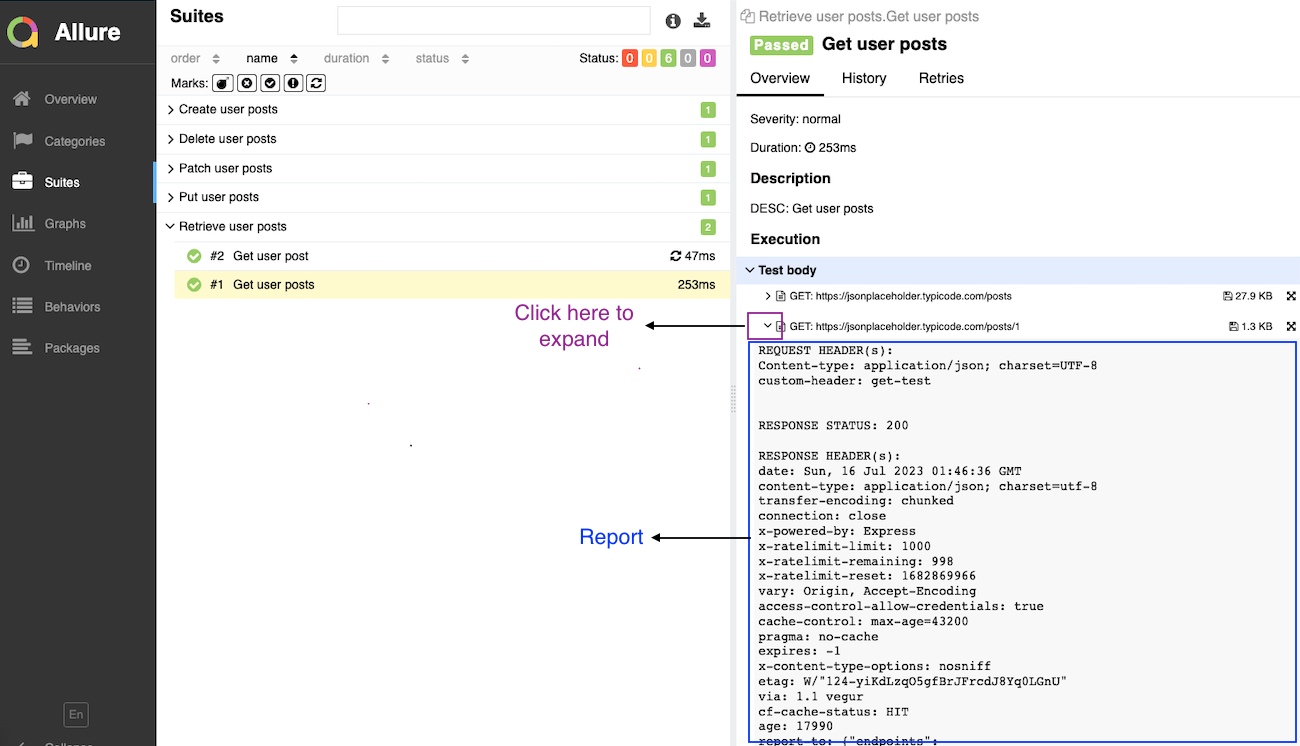
The getHeadersString method takes in the headers object and converts it to a string representation. It iterates through each key-value pair in the headers object, concatenates them with a newline character, and returns the resulting headersString.
The export default new ReportApiDetails() statement exports an instance of the ReportApiDetails class as a singleton object.
This ReportApiDetails class provides a convenient way to report API details for allure reporting in this Test Automation framework.
API Requests files
The API request modules such as getApi, deleteApi are for defining the API requests in the form of methods which are later used by tests for making API calls.
The getApi module is explained below to give an idea about how the ‘requests’ files can be defined.
The code defines a class called GetApi, which is responsible for making GET API requests. It imports the apiManager instance from the apiManager.ts file and the ENV object from the environment.ts file.
import apiManager from "./apiManager";
import {ENV} from "../../environment";

class GetApi {

    POSTS_URL: string = ENV.BASE_URL + "/posts";

        headers = {'custom-header': 'get-test'};

    /**
     * GET /posts
     * @returns The Api Response
     */
    async getUserPosts() {
        return await apiManager.get(this.POSTS_URL, this.headers);
    }

    /**
     * GET /post/:id
     * @param id Post ID
     * @returns The Api Response
     */
    async getUserPost(id: number) {
        return await apiManager.get(this.POSTS_URL + '/' + id, this.headers);
    }
}

export default new GetApi();
The GetApi class has the following components:
- POSTS_URL: This property holds the URL for the
/postsendpoint. The value is obtained by concatenatingENV.BASE_URL(the base URL for the API, likely defined in theenvironment.tsfile) with/posts. - headers: This property defines a custom header for the API requests. In this example, it sets the value of the
custom-headertoget-test. - async getUserPosts(): This method makes a GET request to the
/postsendpoint using the apiManager instance’s get() method. It passes the POSTS_URL and headers as parameters to the get() method and awaits the response. - async getUserPost(id: number): This method makes a GET request to the
/posts/:idendpoint, where:idis a parameter representing the specific post ID. It appends the id parameter to the POSTS_URL to create the complete URL. The method then uses the apiManager instance’s get() method, passing the complete URL and headers as parameters, and awaits the response.
The export default new GetApi() statement exports an instance of the GetApi class as a singleton object.
This GetApi class provides a simple and reusable way to make GET API requests for the specified endpoints using the apiManager instance and the custom headers defined.
Environment
The code sets up a configuration manager for different environments based on the ENVIRONMENT environment variable. It uses an object called environment to define the configuration for different environments (dev, test, release). It then provides a ConfigManager class to retrieve the configuration based on the environment specified.
Here’s a breakdown of the code:
- env: This variable holds the value of the ENVIRONMENT environment variable. If the ENVIRONMENT variable is not defined, it defaults to an empty string.
- Environment configurations: Three objects (dev, test, release) are defined to hold the configuration for different environments. In this example, all environments share the same base URL (https://jsonplaceholder.typicode.com), but you can modify these configurations based on your specific requirements.
- environment: This object maps the environment names to their respective configurations (dev, test, release).
- ConfigManager class: This class takes the environment object as a parameter in its constructor and stores it as the
configproperty. It provides a getConfig method that retrieves the configuration based on the specified environment (env). - configManager: An instance of the ConfigManager class is created, passing the environment object as the configuration.
- export const ENV: This exports the configuration for the current environment based on the value of
env.
By utilising this code structure, you can easily switch between different environment configurations and access the appropriate configuration based on the current environment.
Please note that this code assumes the availability of the ENVIRONMENT environment variable and the default base URL for all environments. You can modify this code to suit your specific environment variable names and configuration needs.
Scripts
There are predefined npm scripts in the framework that provide convenient commands for linting the code, running tests with different environment settings, generating and serving test reports with Allure. These can be modified based on the needs. Currently, the key scripts are:
- lint: This script runs ESLint to perform linting on the project’s TypeScript files (*.ts). It checks for code style, formatting, and potential errors based on the ESLint rules defined in the project.
- env:test: This script sets the environment variable
ENVIRONMENTtotestandTRACE_API_CALLStotrue. It then executes the test script usingnpm run test, which runs the test suite using Jest with the specified environment variables. - env:dev: This script sets the environment variable
ENVIRONMENTtodevandTRACE_API_CALLStofalse. It then executes the test script usingnpm run test, running the test suite with the specified environment variables. - test: This script runs the test suite using Jest. It executes the test files and provides test results, including pass/fail status and any generated test reports or logs.
- report: This script generates an Allure report by running
allure serve. It serves the generated Allure report locally, providing an interactive and comprehensive view of the test execution results.
Get started
To get started with this Test Automation framework, follow these steps:
Step 1: Clone the GitHub Repository
Start by cloning the GitHub repository containing the framework. You can find it at https://github.com/prashantmohapatra/playwright-jest-api-test-automation. Clone the repository to your local machine using the following command:
git clone https://github.com/prashantmohapatra/playwright-jest-api-test-automation.git
Step 2: Install Dependencies
Navigate to the cloned repository’s directory and install the necessary dependencies using npm:
cd playwright-jest-api-test-automation
npm install
Step 3: Run a test using the package scripts
cd api-test
npm run env:test
Step 4: Generate allure report
allure serve
You can modify this framework further to add the tests and their respective requests method.
Conclusion
In conclusion, this Test Automation framework streamlines the intricacies of automating API tests. Harnessing the robust API automation capabilities of Playwright, the intuitive testing framework of Jest, and the exceptional reporting provided by Allure, you can effortlessly develop comprehensive test suites that address diverse scenarios.
As a testament to continuous improvement, I am exploring ways to modularise this framework further. Recognising that Object-Oriented programming is relatively rare in Typescript, as indicated by seasoned developers, my next endeavour involves creating an alternative framework that maintains the same concepts but without relying on classes. Stay tuned for an evolution in your API testing experience!
Pingback:Allure report hosting using S3 - Shine Solutions Group
Posted at 14:37h, 15 March[…] In this blog post, my focus will be on guiding you through the process of hosting Allure reports. As a prerequisite, it’s assumed that you are familiar with how Allure reports function and have the necessary setup. If you are new to Allure reports, you can quickly get started by using the sample API automation framework outlined in my previous article. […]
Igor
Posted at 20:51h, 08 MayGreat article! Could you please explain how to attach screenshots of UI test failures ?